
The early bird gets the worm and guess who was not the early bird? And guess who missed out on awesome flea market finds? Yup, you got it, me. There were a few beautiful vintage dressers, super cheap, but when I inquired....SOLD. One vendor even quipped...these were sold before you even rolled out of bed! Ugh....must he even rub it in? But then I spied this, hidden behind some junk other wonderful finds meant for someone else. He says 75.00...I say, very sweetly, how about 50.00 and he says 60.00. Sold!
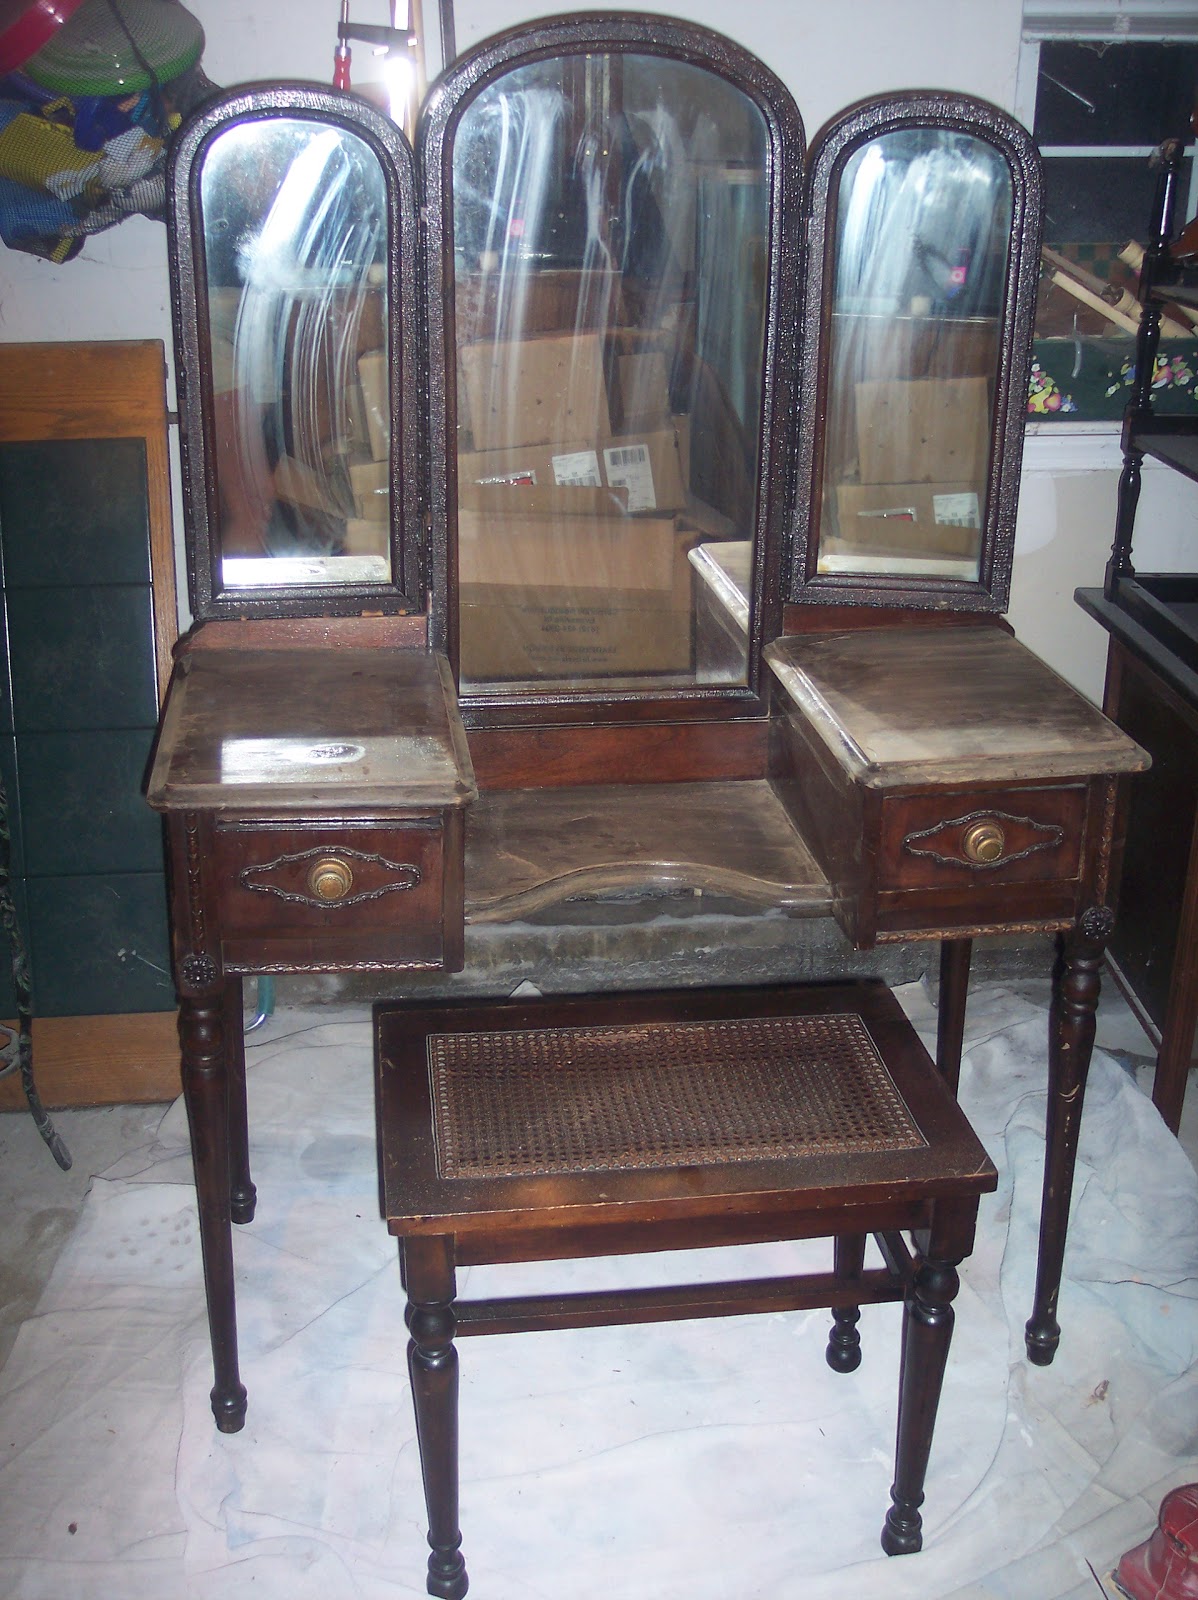
So, I get it home and notice there are pieces of decorative trim missing. And then
I come up with this awesome idea, if I do say so myself, to replicate the pieces of decorative molding. I have seen others use a similar method to create "wood" appliques using Sculpey Clay.
How many times have you passed up something because parts of the trim were missing?? Never again, my friends :)This post just might take me to 200 followers...I'm like the little engine that could, ha!
Using sculpey clay...press the clay on the trim/molding that still exists. Peel it off carefully....now you have your mold. Bake as the directions call for.
 |
| Apparently this was not Sculpey Clay in the craft box....ugh! |
 |
| Found the true Sculpey Clay and now I have my molds. The pic is lame but you get the idea. |
Use a piece of Quik Wood and press it into the Sculpey mold....don't let the QW set. Remove it and using a butter knife cut it to fit the missing area. Use a little wood glue to hold them in place once hardened. Are you totally loving me yet or what???

Prime, it, paint it and it's as good as new!
 |
| Can you find the "missing link"?? |
I replaced the tarnished original mirror and to cut cost used 1/8" thick mirror as opposed to the pricey original 1/4" and secured it w/ a bead of silicone.
I love this color!

 |
| Sadly the woven bench was coming apart so I cut ply wood and added foam and fabric and attached it to the bench w/ screws. |
 |
| Love those original pewter pulls....they cleaned up super nice! |
Happy weekend to all my blogging buddies who amaze and inspire me!
Linking here....


18 comments:
I think you have fabulous staging!!! Another great idea, I did a post awhile back on repairing a gesso mirror kind of the same idea, I used putty, but the wood stuff is a great idea here is the post http://thepolkadotcloset.blogspot.com/search/label/Repair%20Gesso%20frames No passing up great buys just for a little missing molding!! Good job
Carol
Great idea! I'll have to keep it in mind if I ever run across a piece missing trim. It seems simple enough, and missing decorative parts let you save $$!
Sue, that is awesome! Love the idea! It turned out so gorgeous, too! I was thinking of you today as I was driving to pick up my kids from school. I heard Rascal Flatts song "I Won't Let Go" and it reminded me of you and your son! :) Here it is, just in case you've never heard of it~http://www.youtube.com/watch?v=Af8mB9ABuJA. Not sure if that will work or not! :)
Thanks! Now I can repair my mirror. Wow -- whodathunk?
awesome idea!!!! thanks for sharing:)
Super inspiring! Can't wait to try this clay technique, but more for other reasons, being that I want to add detail but can't always find what I have in mind. Thank you for the wonderful idea. I origionally came to check you out since this beautiful piece you have is like the one I have waiting for me to repaint and drag out for my girls that my Grandfather refurbished for my mother then me when I was little. I can't wait to add details to it! Love the color you chose---BEAUTIFUL!
Can't tell! Nice makeover - love the color and distressing.
Dropping by from Met Monday.
Allison
Atticmag
Vintage Gumwood Cabinet Kitchen
Wow! You are so clever! I love the color the end result looks terrific!
Great job!!! Love this
I have some Kwik Wood and if I knew where it was I would repair the trim on my mirror! But for now it will serve as decorative charm! Great makeover by the way!
i am totally impressed with your work on this piece. you are amazing, sue! oh and of course i love this color too!
I'm following! awesome idea and thanks for sharing that neat trick; my love for aqua on vintage just got more intense--I'm going to paint today similar color to an old sewing machine table to use as side table--this color is beautiful.
Gorgeous! I just love the detailing on this!
I am so glad I found your blog this afternoon! My Mom has an antique mirror that needs some repair and you just answered my how-to question! Thank you! From your newest follower!!
GREAT re-do, and GREAT advice...THANKS!!
super tip! beautiful vanity, love the color.
catching you this week,
gail
Cool! You definitely got my "follow" after that need trim trick! I have a piece sitting in my basement sadly waiting for inspiration to strike because I didn't notice the strip of decorative trim missing! I have the clay AND the wood fill - who'd have thunk!? Awesome idea and thanks mucho for it!
thanks for the great tip....i need to get some of that sculpey clay...
hugs
Post a Comment